Getting Started with the Strava API
Welcome to the Strava API! This is a brief overview of how to use our API. Anyone who breaks a sweat is an athlete, so we refer to our users as athletes.
Table of Contents
A. Basic info about the API
B. How to create an account
C. How to make a cURL request
D. How to authenticate with OAuth 2.0
E. How to use the Swagger Playground
F. Why Do I Need Webhooks?
G. How to Get Support
A. Basic info about the API
The Strava REST API includes data on athletes, activities, routes, and gear. The Strava API does not allow you to get data for all Strava public athletes, as you can see on our website.
To get data on athletes, you will have to make an application and request that athletes sign in with Strava, and grant your application certain permissions using OAuth 2.0. You can get data on yourself without authentication for testing purposes.
Strava API usage is limited on a per-application basis using both a 15-minute and daily request limit. The default rate limit allows 200 requests every 15 minutes, with up to 2,000 requests per day.
All new applications start in single-player mode. This is the default state where only your own Strava account can authenticate with the app, which lets you build and test your integration against your own data. A Strava subscription is a prerequisite for creating an app.
Once your app is configured in your API dashboard, you can upgrade your access directly from your API Settings Dashboard. This raises your access to:
Athlete capacity of 10
Read read limits: 200 requests / 15min & 2,000 requests / day
Overall rate limits: 400 requests / 15min & 4,000 requests / day
Once your app reaches 10 connected athletes and you’re ready to scale further, please submit your app for review!
- Quick Links
Rate limits
Uploading files
API Agreement
Brand Guidelines
- Examples of What to Build with the Strava API
Create a print of your activity
Add weather for your activities
Measure how you are performing in your athletic activities
B. How to Create an account
To start developing with the Strava API, you will need to make an application
- If you have not already, go to https://www.strava.com/register and sign up for a Strava account.
- After you are logged in, go to https://www.strava.com/settings/api and create an app. Note: A Strava subscription is required.
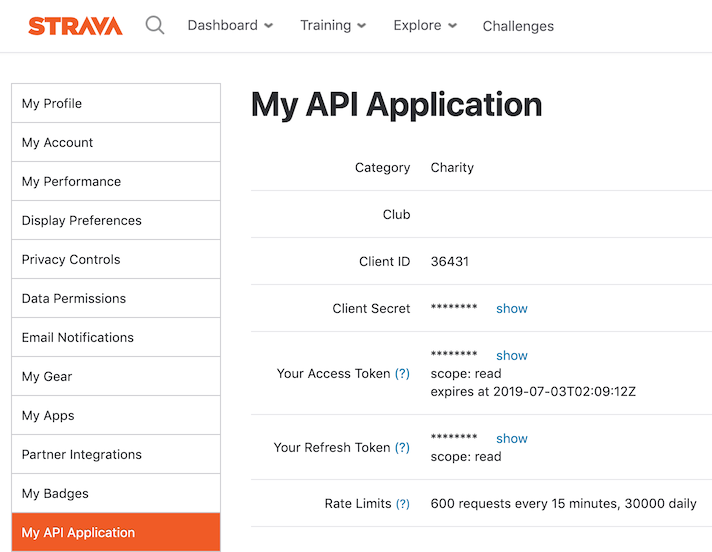
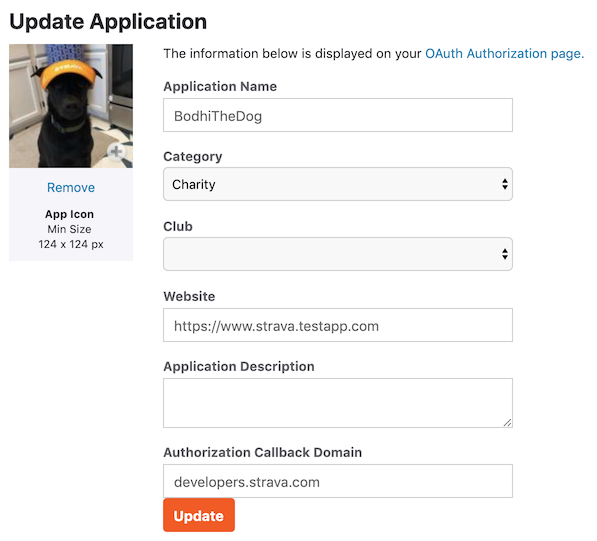
- You should see the “My API Application” page now. Here is what everything means:
- Category: The category you chose for your application
- Club: Will show if you have a club associated with your application
- Client ID: Your application ID
- Client Secret: Your client secret (please keep this confidential)
- Access token: Your access token, which will change every six hours (please keep this confidential)
- Your Refresh token: The token you will use to get a new access token (please keep this confidential)
- Rate limits: Your current rate limit
- Authorization Callback Domain: When building your app, change “Authorization Callback Domain” to localhost or any domain. When taking your app live, change “Authorization Callback Domain” to a real domain.

C. How to Make a cURL request
Let’s make a cURL request against the Strava API. cUrl is a command line tool and is available on all platforms. For our first request, we are going to get our profile information which is this call: https://developers.strava.com/docs/reference/#api-Athletes-getLoggedInAthlete
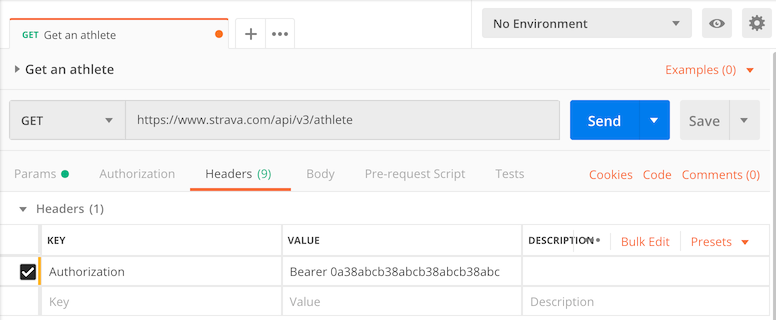
Access tokens are required for all requests, and can be included by adding “Authorization: Bearer #{access_token}” as a header.
To get your access token, go to https://www.strava.com/settings/api. Access tokens expire every six hours.
Make a cURL request:
curl -X GET \
https://www.strava.com/api/v3/athlete \
-H 'Authorization: Bearer YOURACCESSTOKEN'
If you are using Postman, it will look like this:
D. How to Authenticate
As you may have already noticed, we require authentication via OAuth 2.0 in order to request data about any athlete. OAuth 2.0 allows developers to interact with Strava athletes without having to store sensitive information. View our full documentation here.
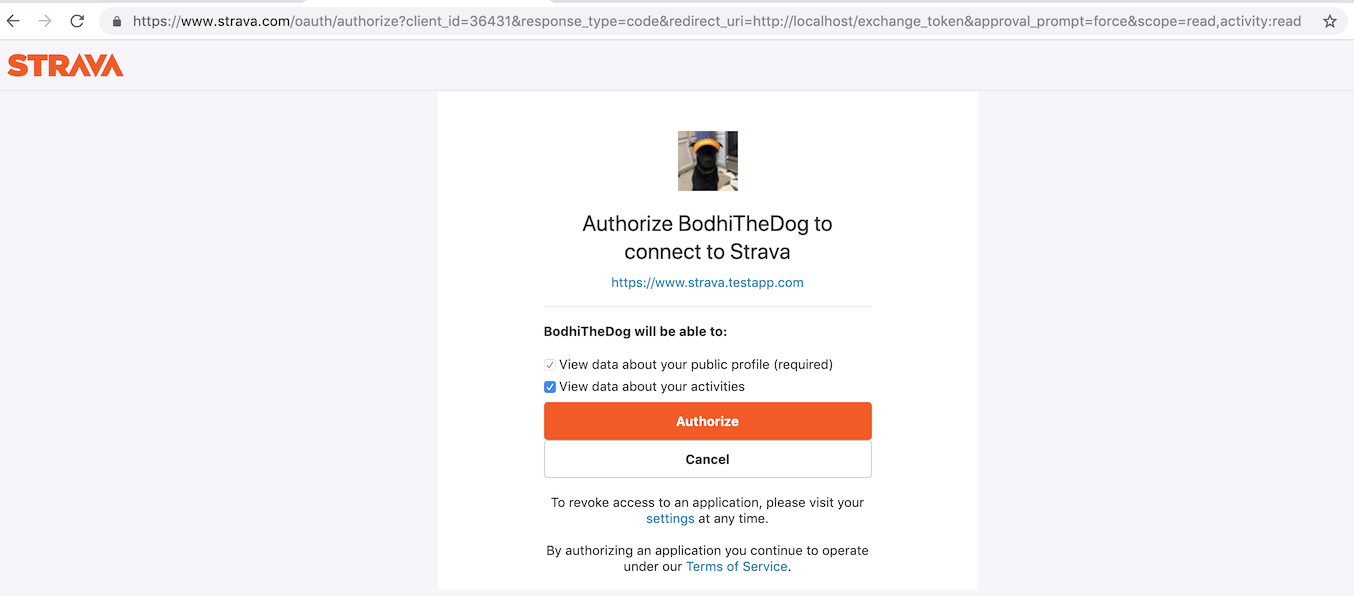
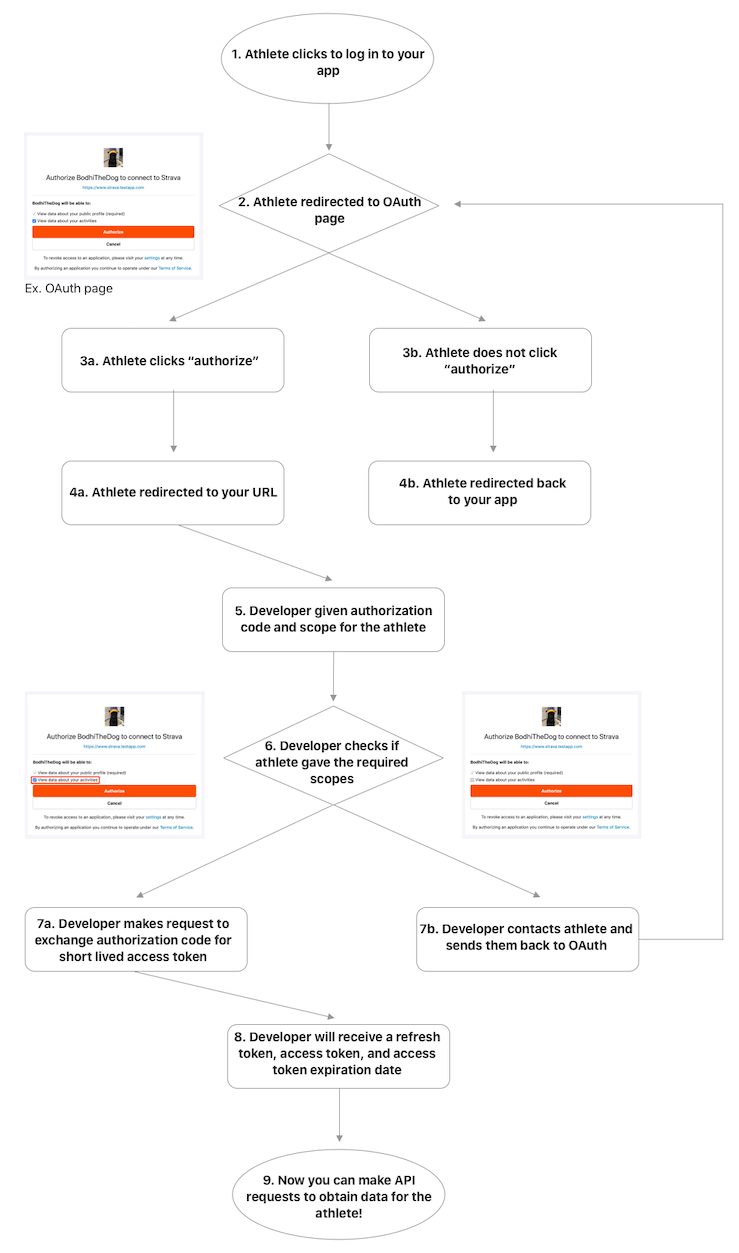
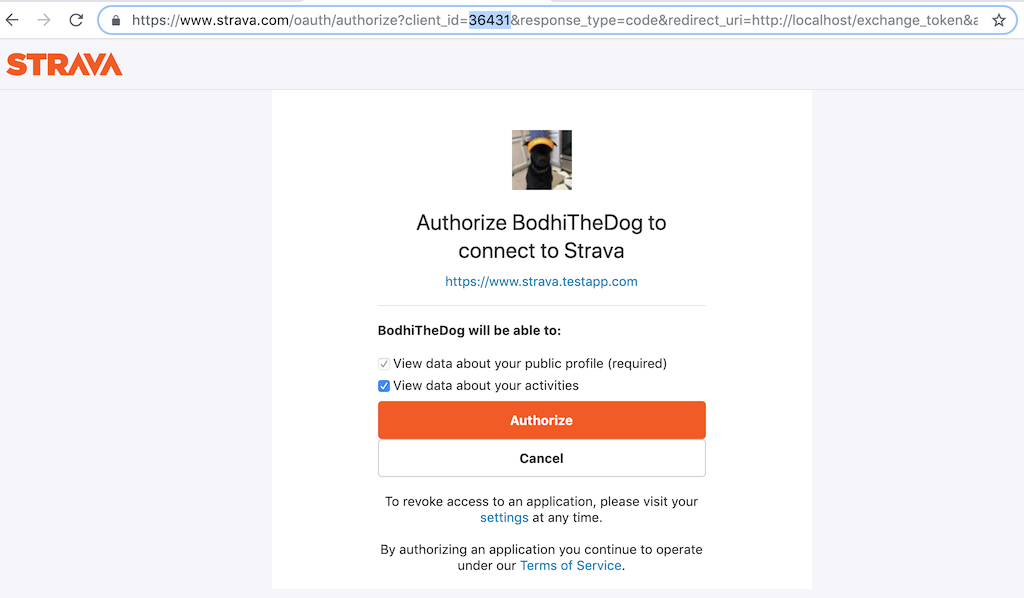
When OAuth is initiated, the athlete is prompted by the application to log in to the Strava website and give consent to the requesting application. This is what your athlete will see:
After the athlete accepts or rejects the authorization request, Strava redirects the athlete to a URL specified by the application. If the athlete authorized the application, the URL query string will include an authorization code and the scope accepted by the athlete. Please check to see that the athlete has accepted all of your scopes. The application must complete the authentication process by exchanging the authorization code for a refresh token and short-lived access token.
Confused? Here is a Graph:
For demonstration purposes only, here is how to reproduce the graph above with cURL:
- Go to https://www.strava.com/settings/api and copy your Client ID
- Paste your Client ID into this URL:
http://www.strava.com/oauth/authorize?client_id=[REPLACE_WITH_YOUR_CLIENT_ID]&response_type=code&redirect_uri=http://localhost/exchange_token&approval_prompt=force&scope=read - Go to a browser
- Paste the URL you edited into the browser window (step 1 and 2 from the graph)
- Hit enter
- When you see the authorization page, click “Authorize” (step 3a from the graph)
- After you click “Authorize,” you should see something like, “this site can’t be reached”
- Stay on that page and look at the URL
- The URL will show the authorization code and scope accepted by the athlete (step 5 from the graph)
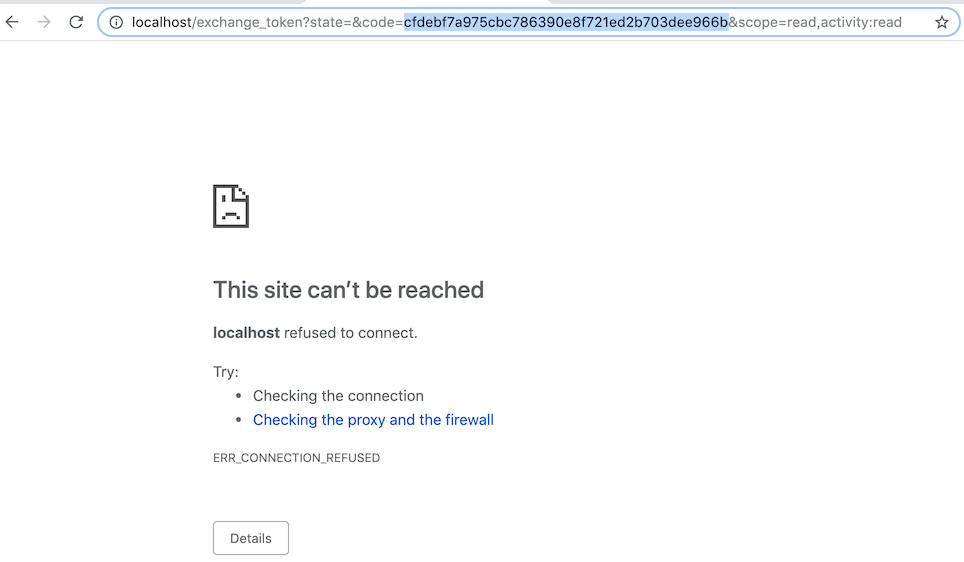
- Copy the authorization code
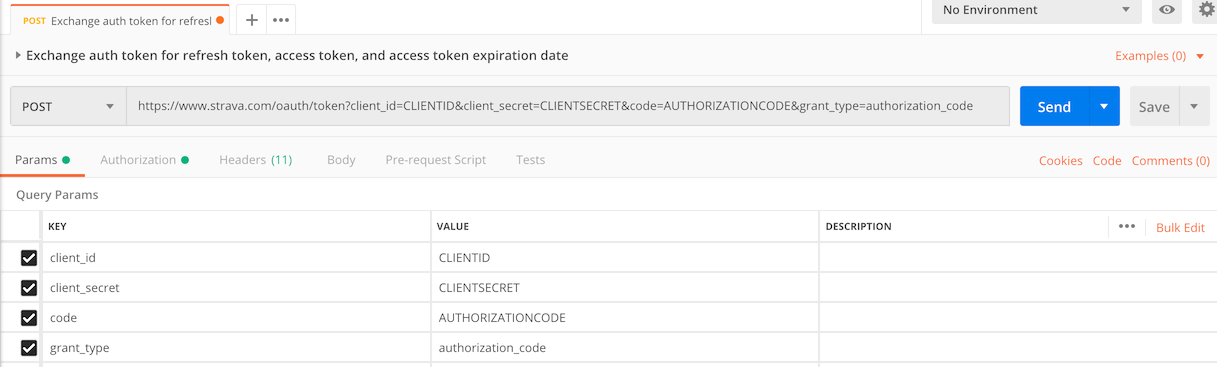
Make a cURL request to exchange the authorization code and scope for a refresh token, access token, and access token expiration date (step 7a from the graph). Replace the client_secret and code. The response should include the refresh token, access token, and access token expiration date (step 8 from the graph).
Sample cURL request:
	curl -X POST https://www.strava.com/oauth/token \
	-F client_id=YOURCLIENTID \
	-F client_secret=YOURCLIENTSECRET \
	-F code=AUTHORIZATIONCODE \
	-F grant_type=authorization_code
If you are using Postman, here is a sample request:
 Sample response:
{
    "token_type": "Bearer",
    "expires_at": 1562908002,
    "expires_in": 21600,
    "refresh_token": "REFRESHTOKEN",
    "access_token": "ACCESSTOKEN",
    "athlete": {
        "id": 123456,
        "username": "MeowTheCat",
        "resource_state": 2,
        "firstname": "Meow",
        "lastname": "TheCat",
        "city": "",
        "state": "",
        "country": null,
        ...
    }
}
For more information on authentication, click here.
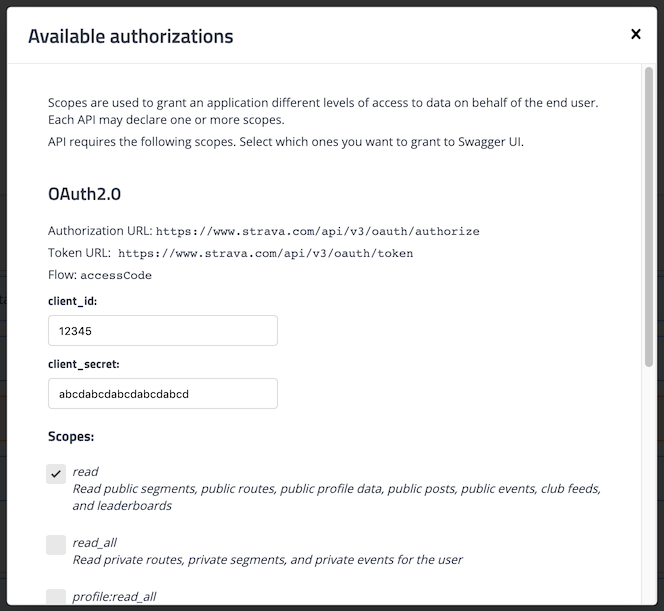
E. How to Use the Swagger Playground
- The Swagger Playground is the easiest way to familiarize yourself with the Strava API by submitting HTTP requests and observing the responses before you write any client code. It will show what a response will look like with different endpoints depending on the authorization scope you receive from your athletes. To use the Playground, you will have to change your “Authorization Callback Domain” to developers.strava.com.
- Go to the Playground, https://developers.strava.com/playground, and click the green “Authorize” button on the right.
- You will use your Client ID and Client Secret from https://www.strava.com/settings/api.
F. Why Do I Need Webhooks?
- Per our API terms, you need to implement webhooks to know when an athlete has deauthorized your API application
- To avoid hitting rate limits
- Instead of polling to see if athletes have new activities, you can subscribe to activity updates
- To know if activities have changed from public to private
- To subscribe to webhooks, please follow the instructions here
G. How to Get Support
Before emailing, please check our documentation first:
- Authentication: https://developers.strava.com/docs/authentication
- Webhooks: https://developers.strava.com/docs/webhooks
- API docs: https://developers.strava.com/docs/reference
- Rate Limits: https://developers.strava.com/docs/rate-limits/
- Uploads: https://developers.strava.com/docs/uploads/
If you have questions, please check our developer community hub. Remember, never share access tokens, refresh tokens, authorization codes, or your client secret in a public forum.